The Best Noise Reduction For Landscape Photography
(Lightroom Denoise VS Topaz Labs VS DXO PureRAW3) A Deep Dive
In this video, I compare two photographs using Topaz Labs’ Denoise and Lightroom’s Denoise to see which one is the best noise reduction tool. DXO PureRAW is not included in this video, but I have added DXO in the examples below for full comparison. I also added an example from Topaz Photo AI to see how that stacks up vs their dedicated Denoise Software. You can also download all of the high-resolution JPEGs of all these images on my page and take a look at the details on your own.

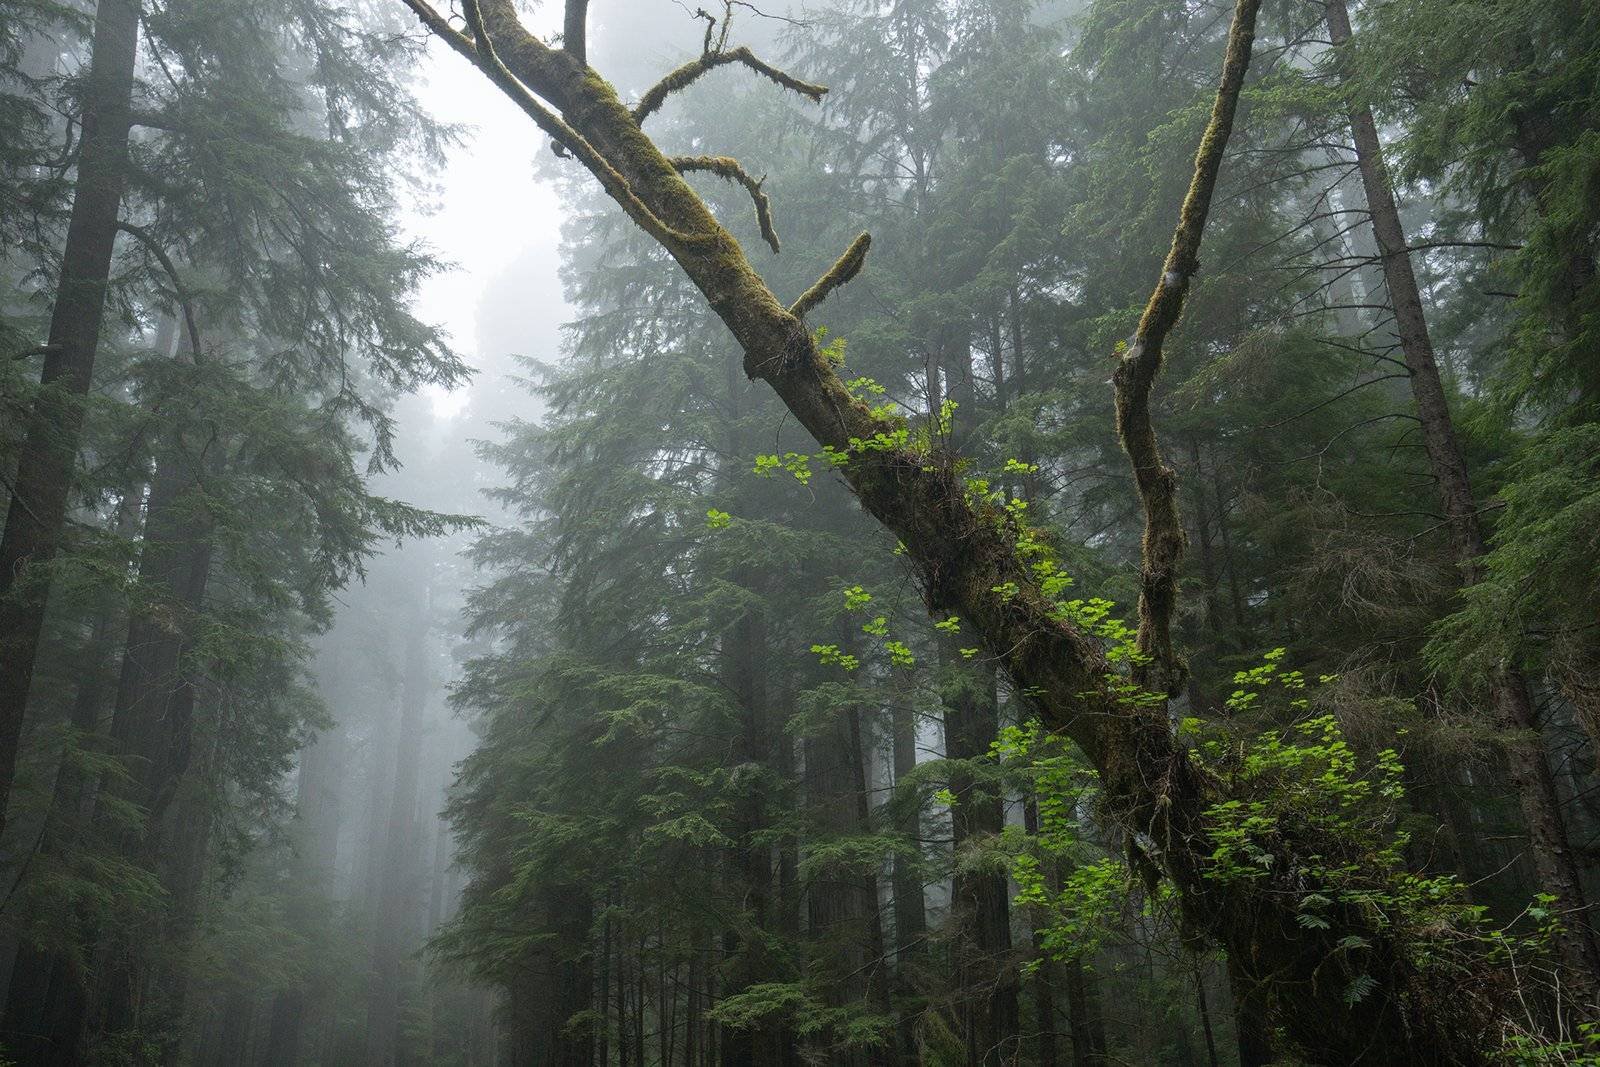
Here are the two files we are comparing, both taken with the Sony A1. The first is a simple Milky Way shot at 6400 ISO, which is quite an extreme example for astrophotography. The second example is a more subtle redwood image at 500 ISO but massively underexposed, with the shadows brought up in post-processing. I feel like this is more representative of the noise you will see in a day-to-day landscape photography session.
Lightroom Denoise

At first glance, I love the simplicity of Lightroom’s Denoise. It’s just a simple button with a slider, and on the left, you get a live preview. I recommend using this tool at around 30-40% for lower ISO files and then 50% for really severe noise reduction. If you go higher than that, the algorithm can remove too much detail from the image. Once you click “Enhance,” the file saves directly as a .DNG into Lightroom.
Topaz Labs Denoise

Here is Topaz Denoise at first glance, and you can see that it has a much more complicated interface. It offers multiple algorithms, different preferences, and various options. The comparison view is indeed a useful feature where you can check the different models live. One unique aspect of Topaz compared to Lightroom and DXO is that you can apply noise reduction to files that are already edited and saved in formats other than RAW, such as TIFFs or JPEGs.
DXO PureRAW 3

DXO is a super simple program. All you have to do is input the files, select your desired output, and the program will do the work for you. The simplicity of DXO is something to be appreciated.
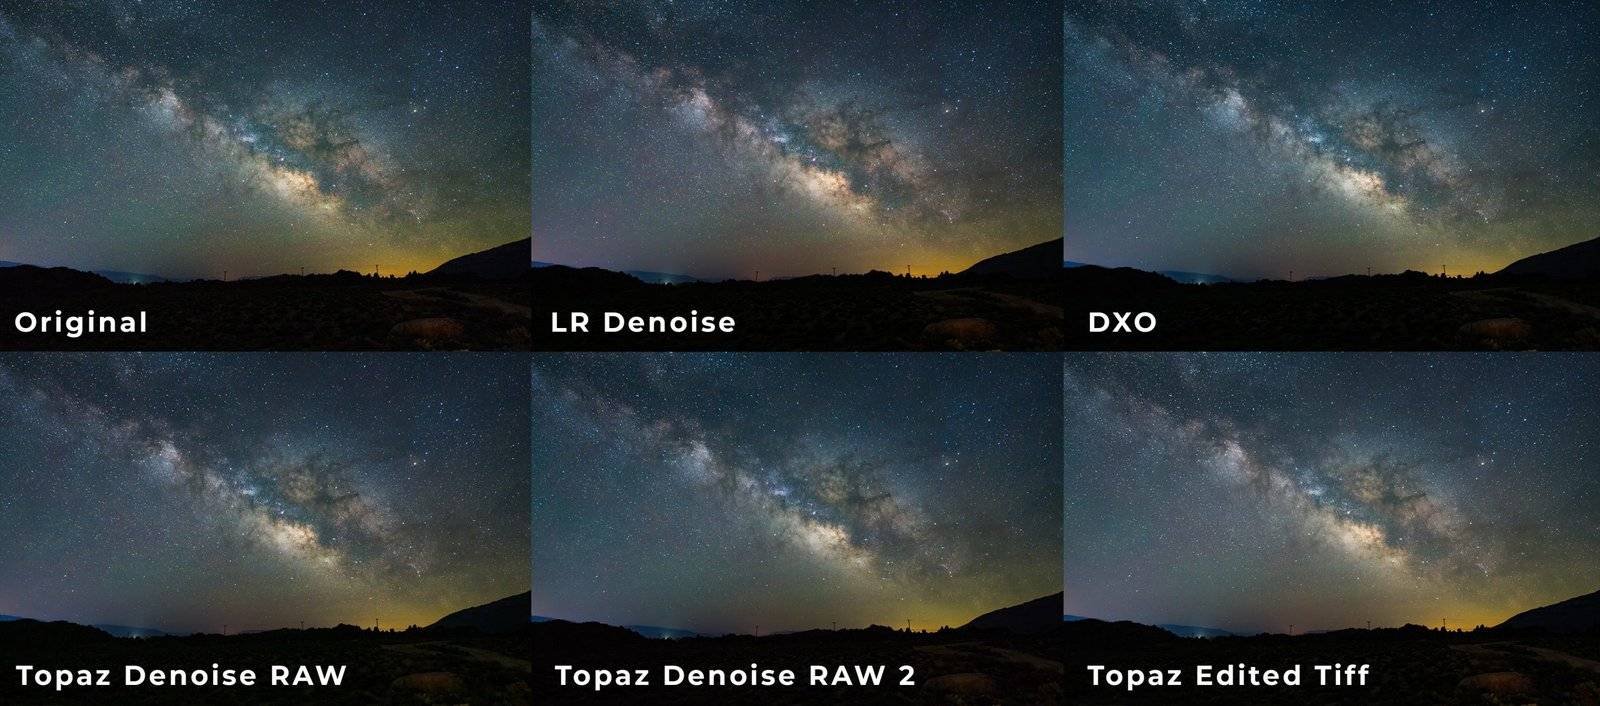
Before we dive into the zoomed-in files. Here is a quick overview of how each program handled the colors and tones.
Lightroom Denoise VS Original
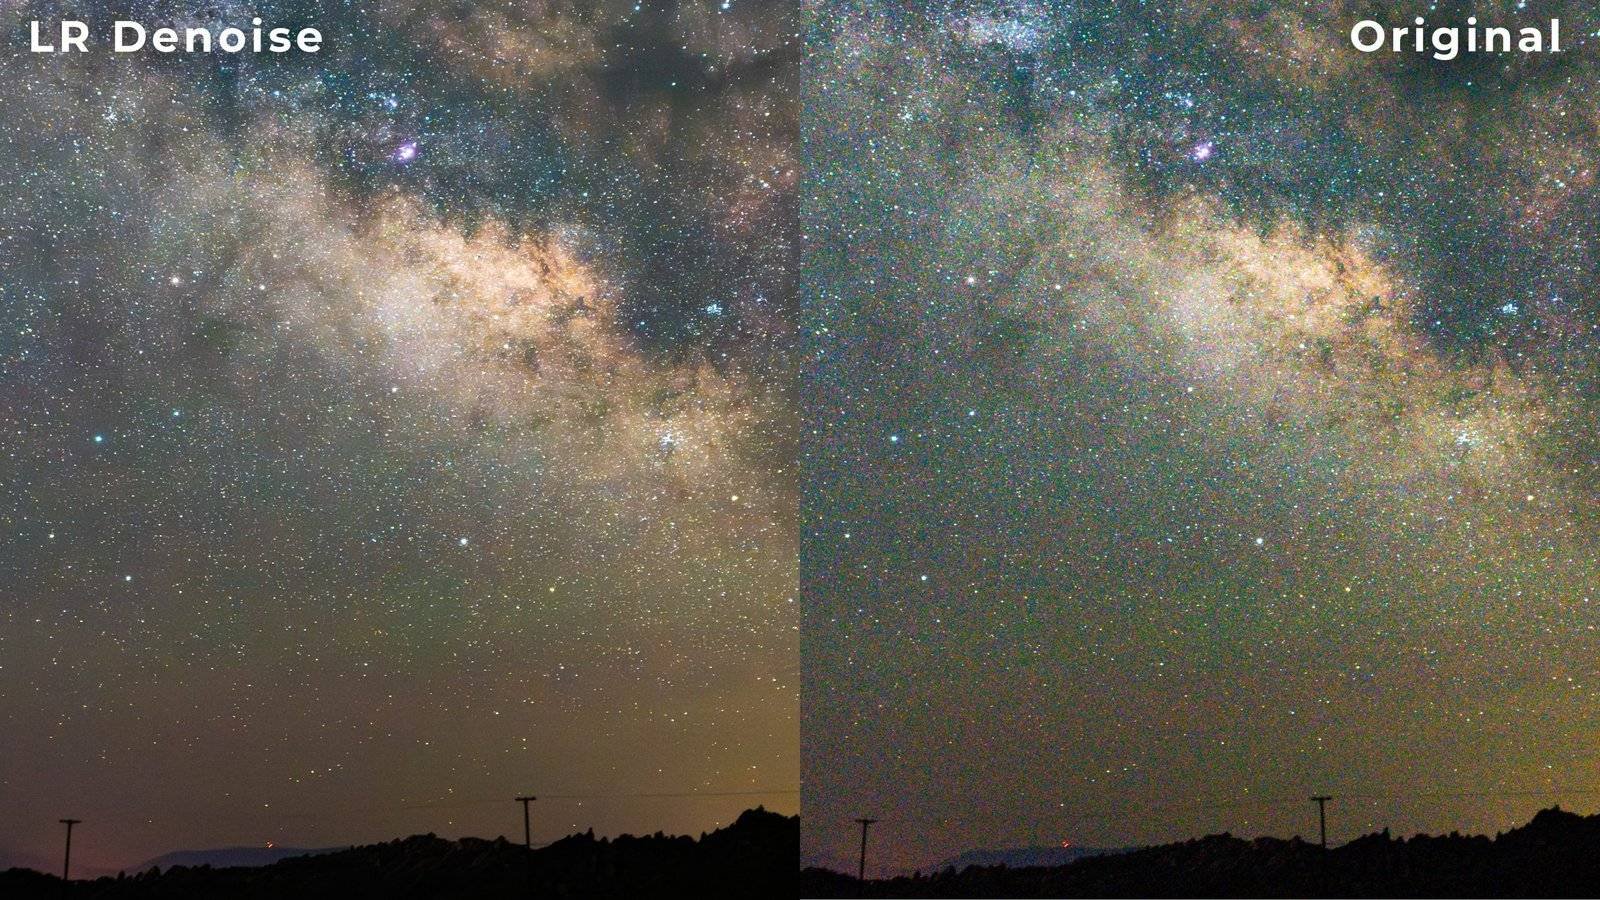
Okay, here is Lightroom Denoise compared to the original file, and right off the bat, it looks great. There is good color retention here, as well as detail preservation. This was at 50%.
Lightroom Denoise VS Lightroom Manual Reduction

Here is an example of Lightroom Denoise vs manual noise reduction, and you can see just how much more detail is recovered in the Denoise version. I also think the colors remain intact, whereas the manual noise reduction introduces some muddiness to the colors. The Denoise does have some slight blotchiness in the empty patches. So it would be worth going through with a bit of extra manual color noise reduction to remove that.
Original VS Topaz Denoise (RAW – LowLight)
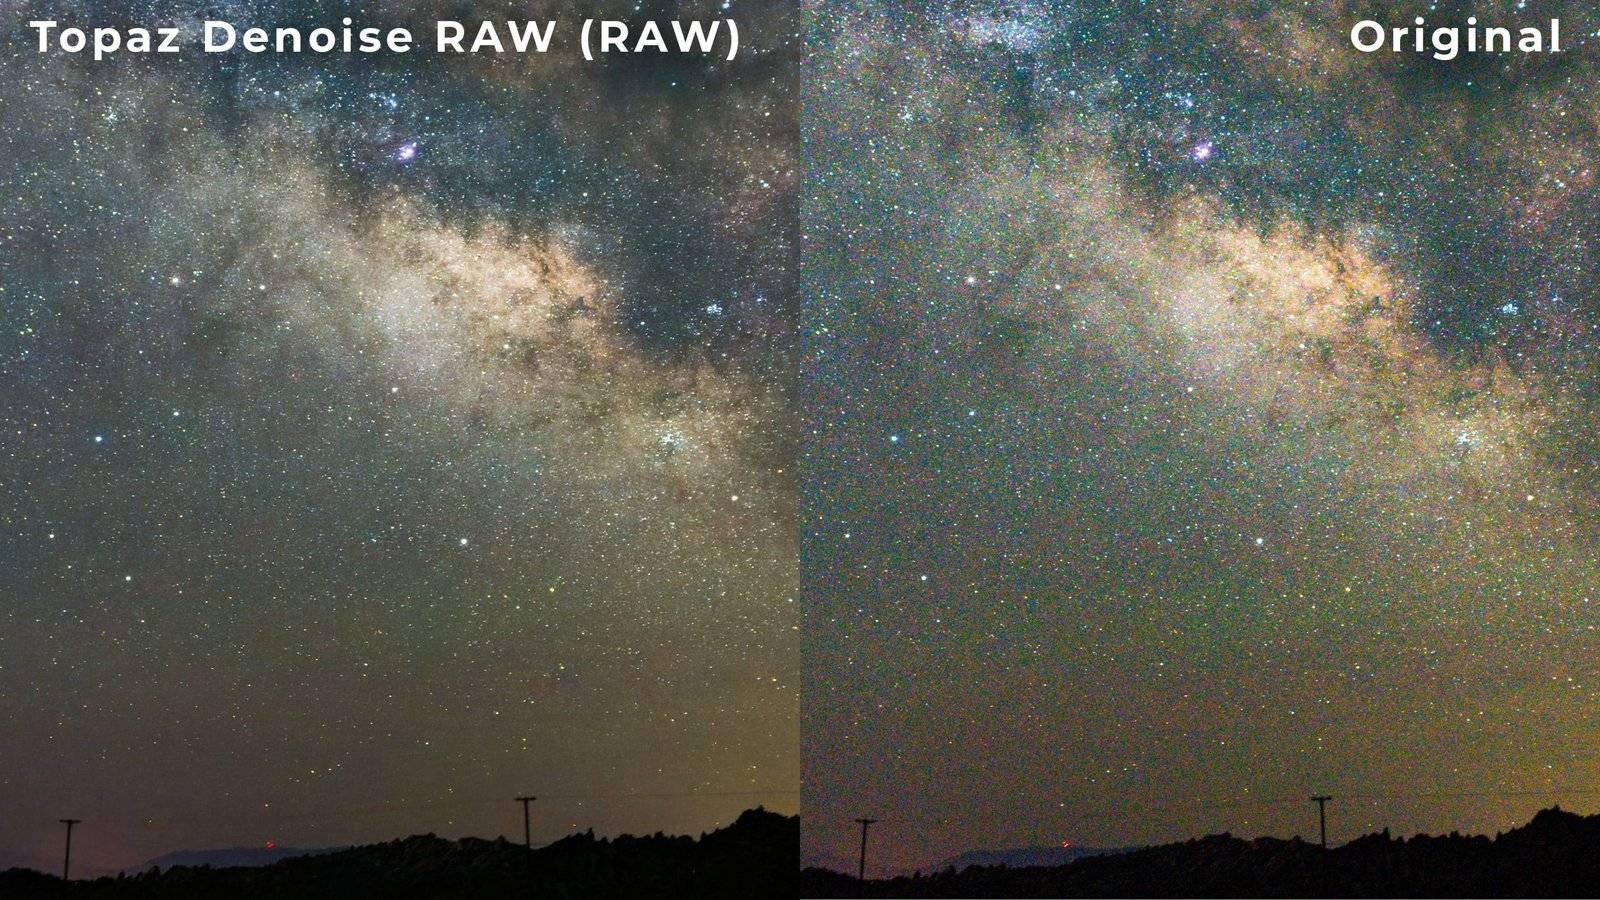
Here is the original image compared to our first Topaz export, and Topaz definitely does a good job of removing the noise. However, it’s worth noting that the colors do become a touch muddy in the process.
DXO PureRAW 3 VS Original
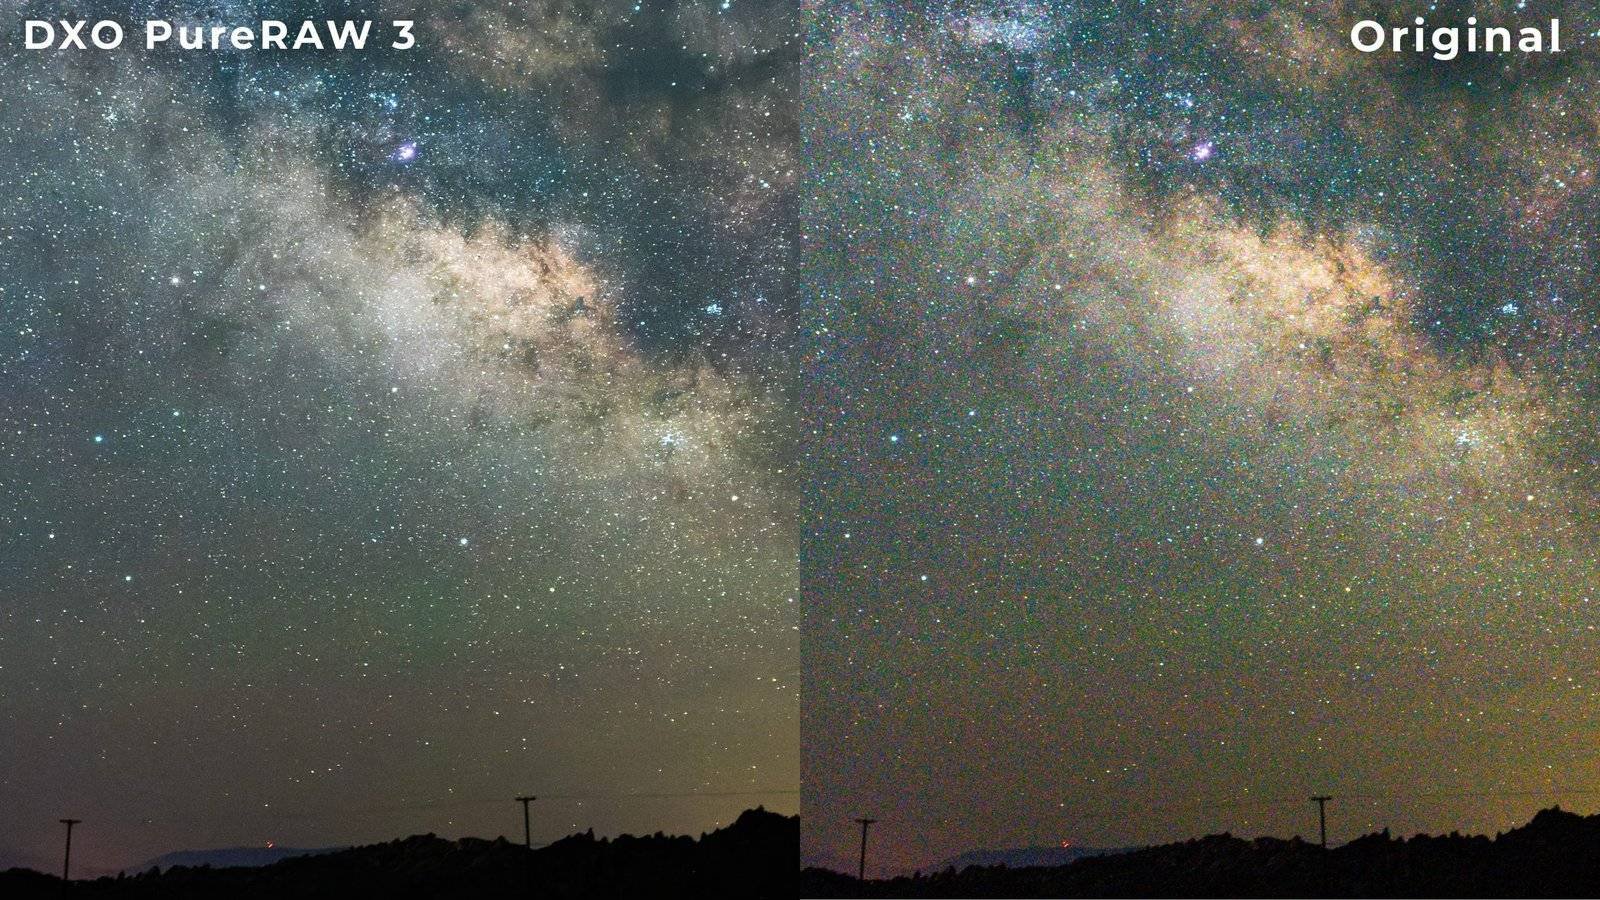
Here is DXO Pure RAW vs the original. Personally, I think it did a good job here overall. Still some colors were lost in the reduction and a slight green/blue cast on the photo compared to the others.
Lightroom Denoise VS Topaz Labs (RAW – Raw Settings)

Here is where things get a bit interesting, comparing the two software head to head. In this comparison, I feel as though Lightroom Denoise did a much better job retaining the color and details here, while still removing a bit more noise than Topaz.
Lightroom Denoise VS Topaz Labs (RAW – LowLight)

Here is another version using Topaz with the lowlight settings. It certainly reduced more noise, but it still has the same issue of color muddiness. I was also a bit underwhelmed by the amount of star beveling and compression that Topaz added to this one.
Topaz Labs (RAW – Raw Settings) VS Topaz Labs (Edited .TIFF – LowLight)
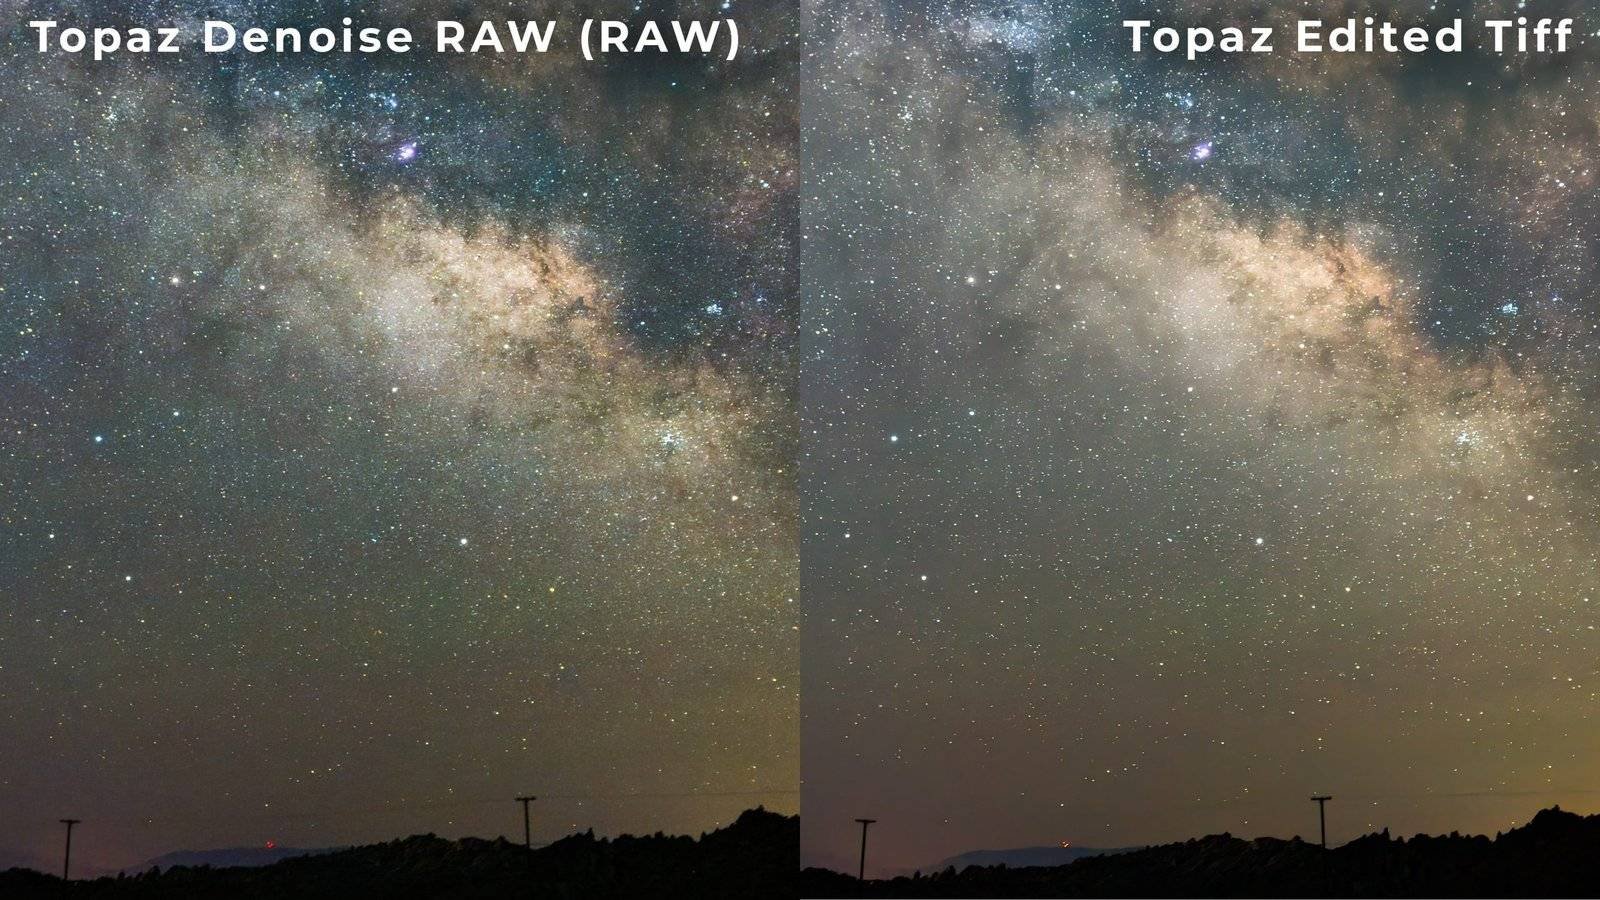
Now, here is where it gets really interesting. This is a comparison of using a RAW file in Topaz and then applying effects after vs applying the effects first and then bringing an edited TIFF into Topaz. Personally, I feel like the TIFF file works a bit better here, although it’s a personal preference. The Tiff blur is quite extreme even on lower settings. Maybe a blend of these two images at 50% each would yield the most natural results.
Topaz Labs (Edited .TIFF – LowLight) VS Lightroom Denoise

Here is the Topaz-edited TIFF vs Lightroom Denoise, and to my eyes, Lightroom wins in terms of preserving the details and colors of the file. But I think Topaz did a good job here and bringing back a touch of the original file into this Edited Tiff could yield some nice results. I feel like I would also need to pump some saturation into the Topaz file to get the colors to match the original.
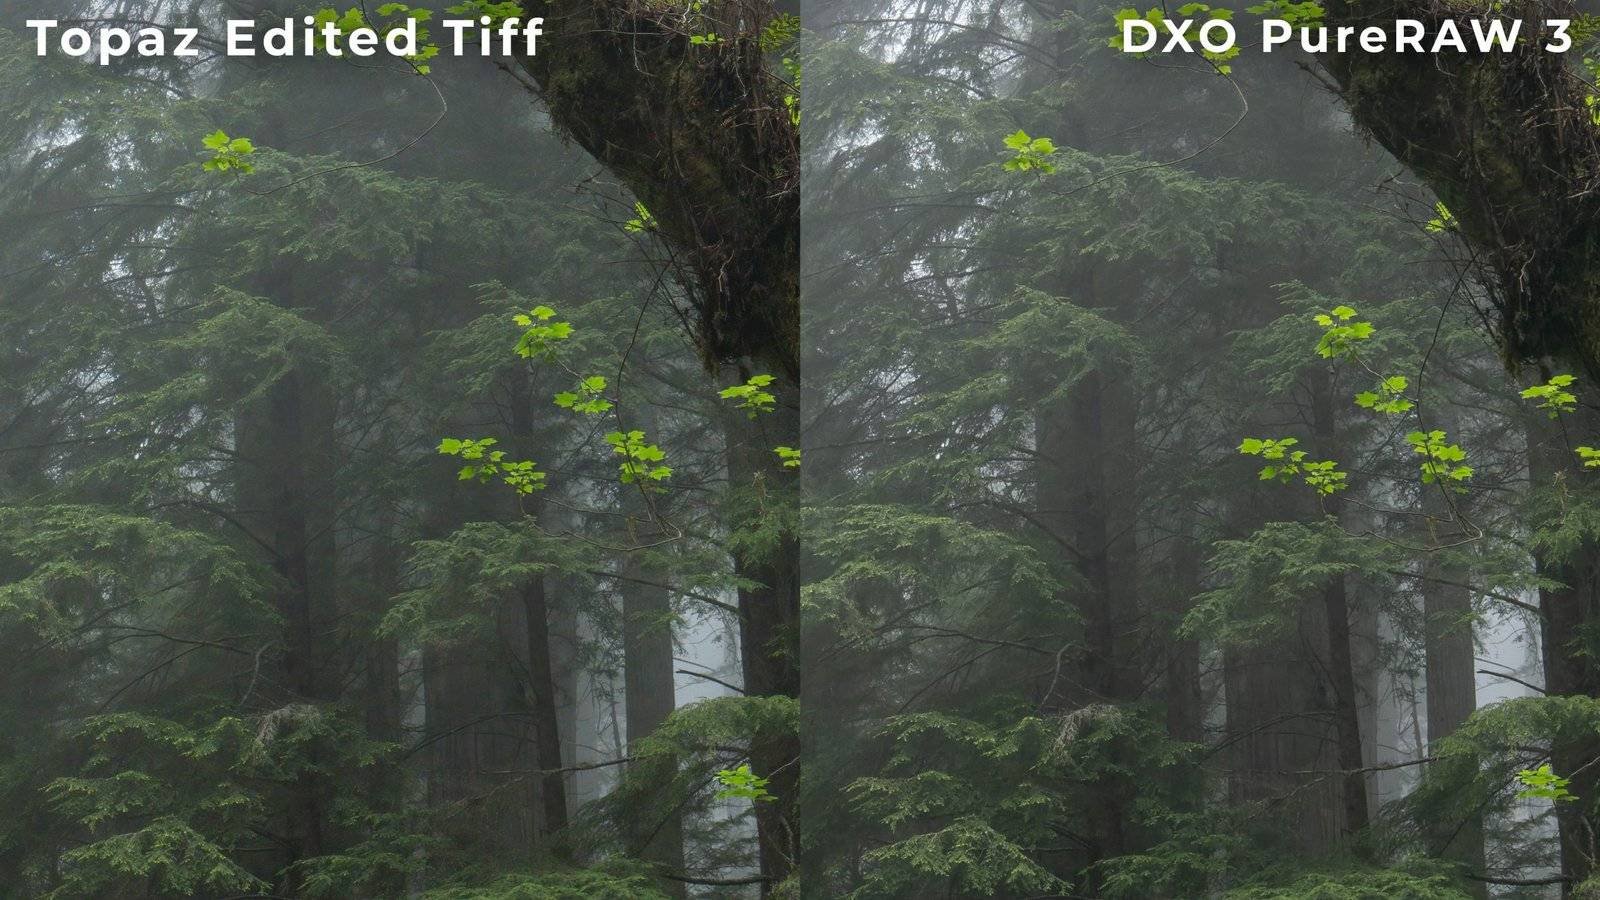
DXO PureRAW 3 VS Topaz Labs (Edited .TIFF – LowLight)

Here is DXO Pure RAW vs the Topaz-edited TIFF. I think the colors look more natural in the Topaz edit, but the detail works a bit better in the DXO file. I almost feel like blending these two files 50% on top of each other would be the perfect mix here.
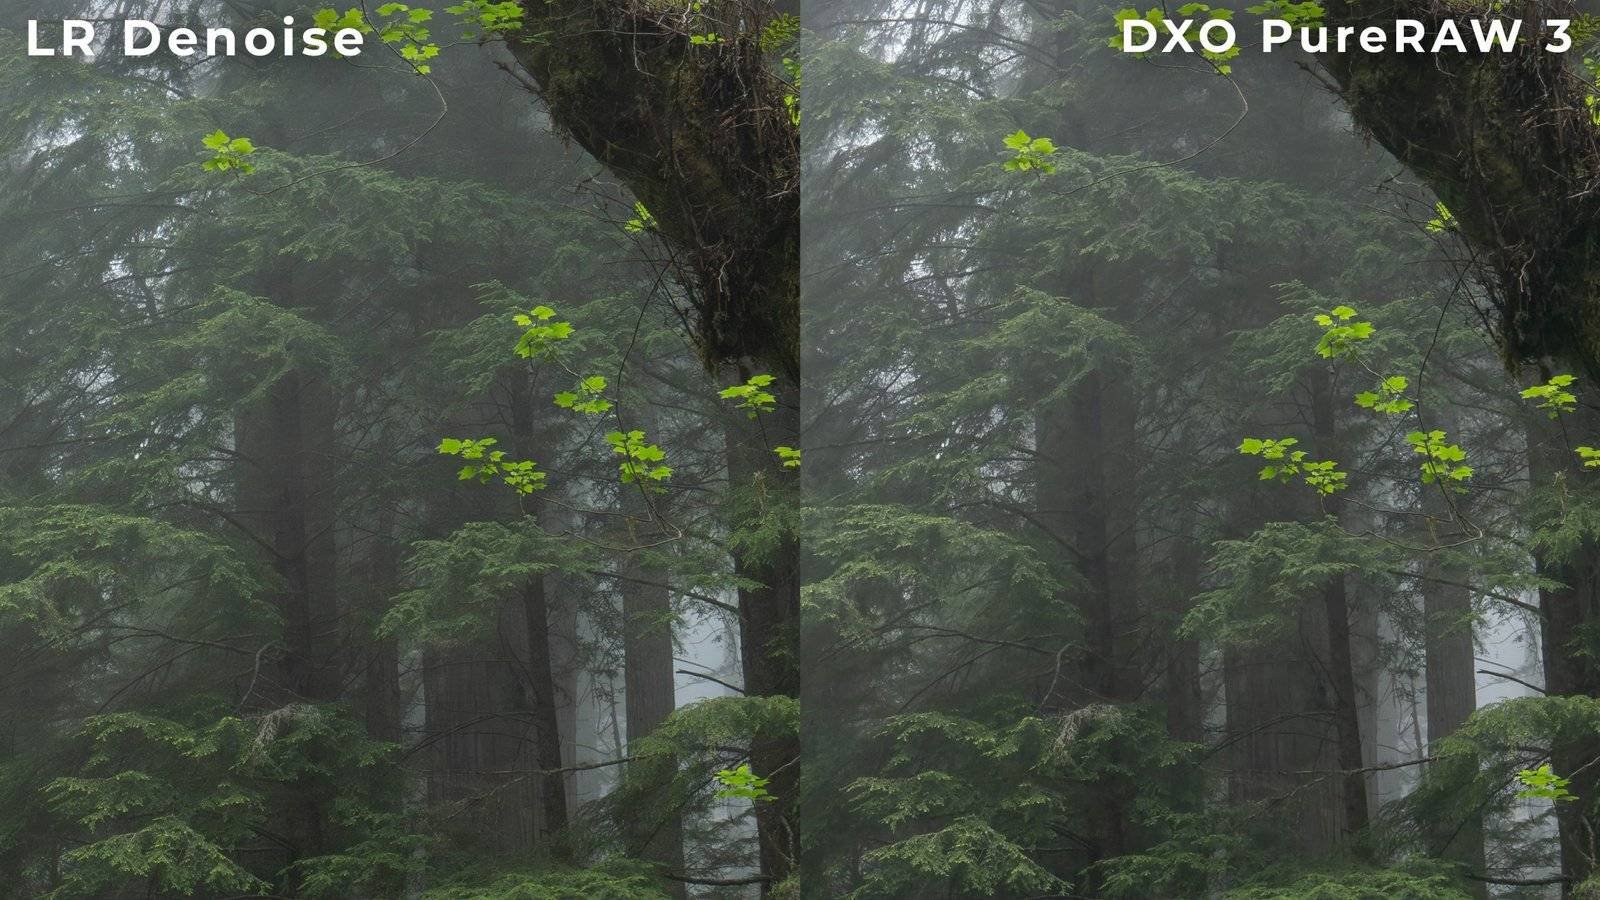
DXO PureRAW 3 VS Lightroom Denoise
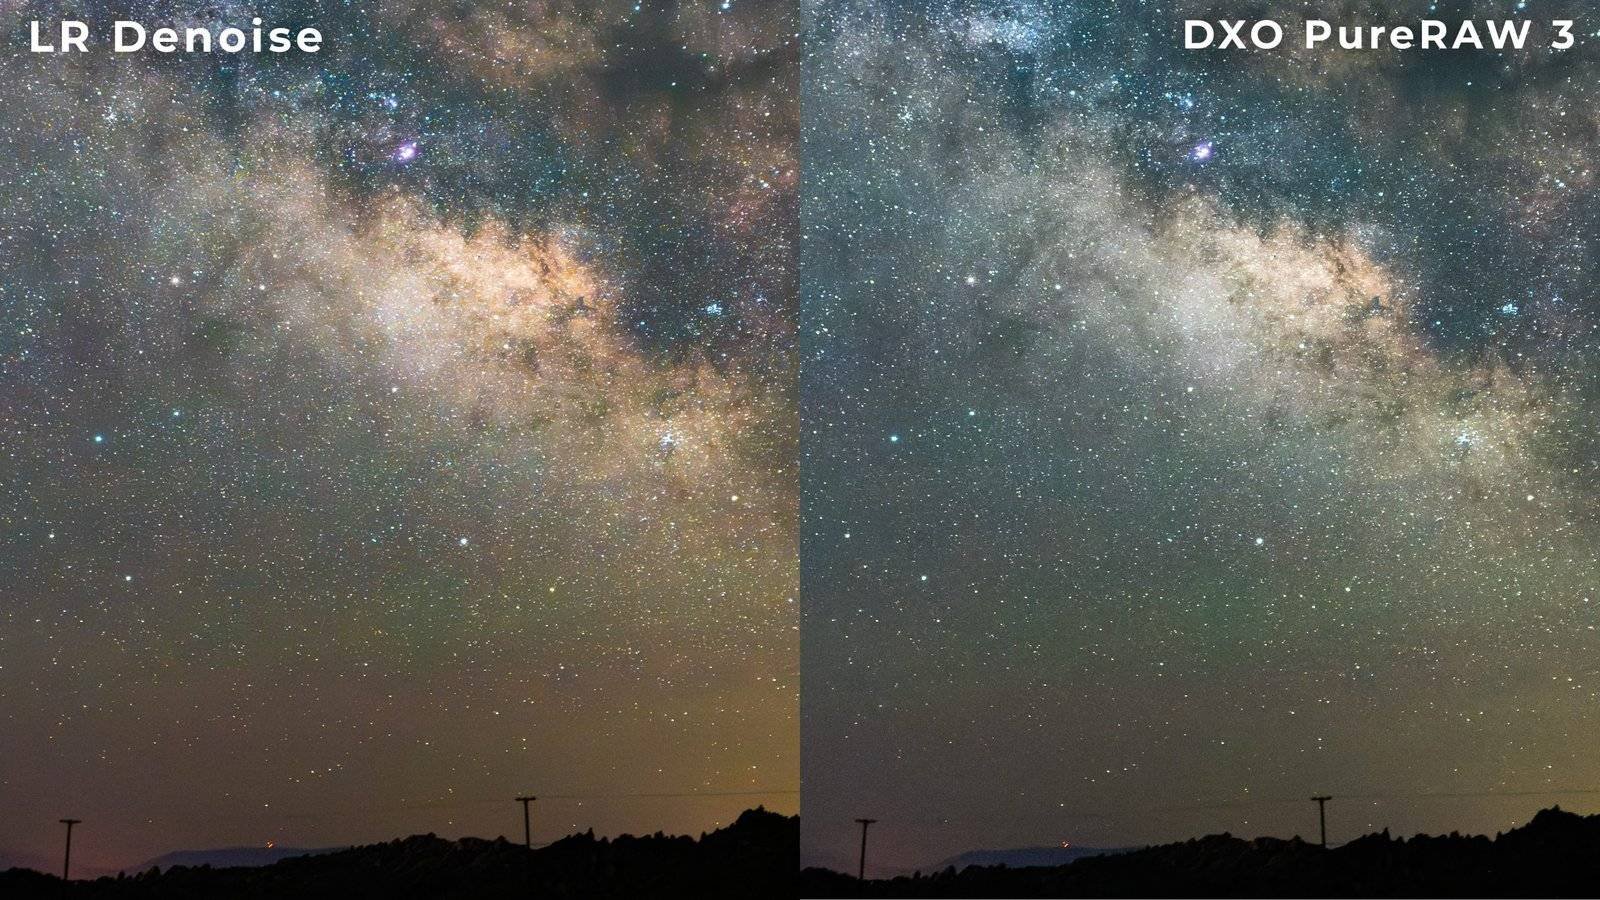
Here is DXO vs Lightroom Denoise. Personally, I feel that Lightroom Denoise wins in terms of color retention and noise reduction.
Topaz Photo AI RAW VS Topaz Denoise RAW

Topaz Labs also has another plug-in called Photo AI. This tool combines all three of their software: Denoise, AI Sharpen, and Gigapixel AI. It’s a great tool, and I use it all the time to enhance images for print. So, I decided to do a quick test to see how RAW noise reduction looks between the two tools. To my eyes, Photo AI did a surprisingly bad job in comparison to the dedicated Denoise Software, both in terms of color retention, noise reduction, and even image compression. In terms of astrophotography in my opinion Lightroom is the best noise reduction tool.
Original VS Lightroom Denoise
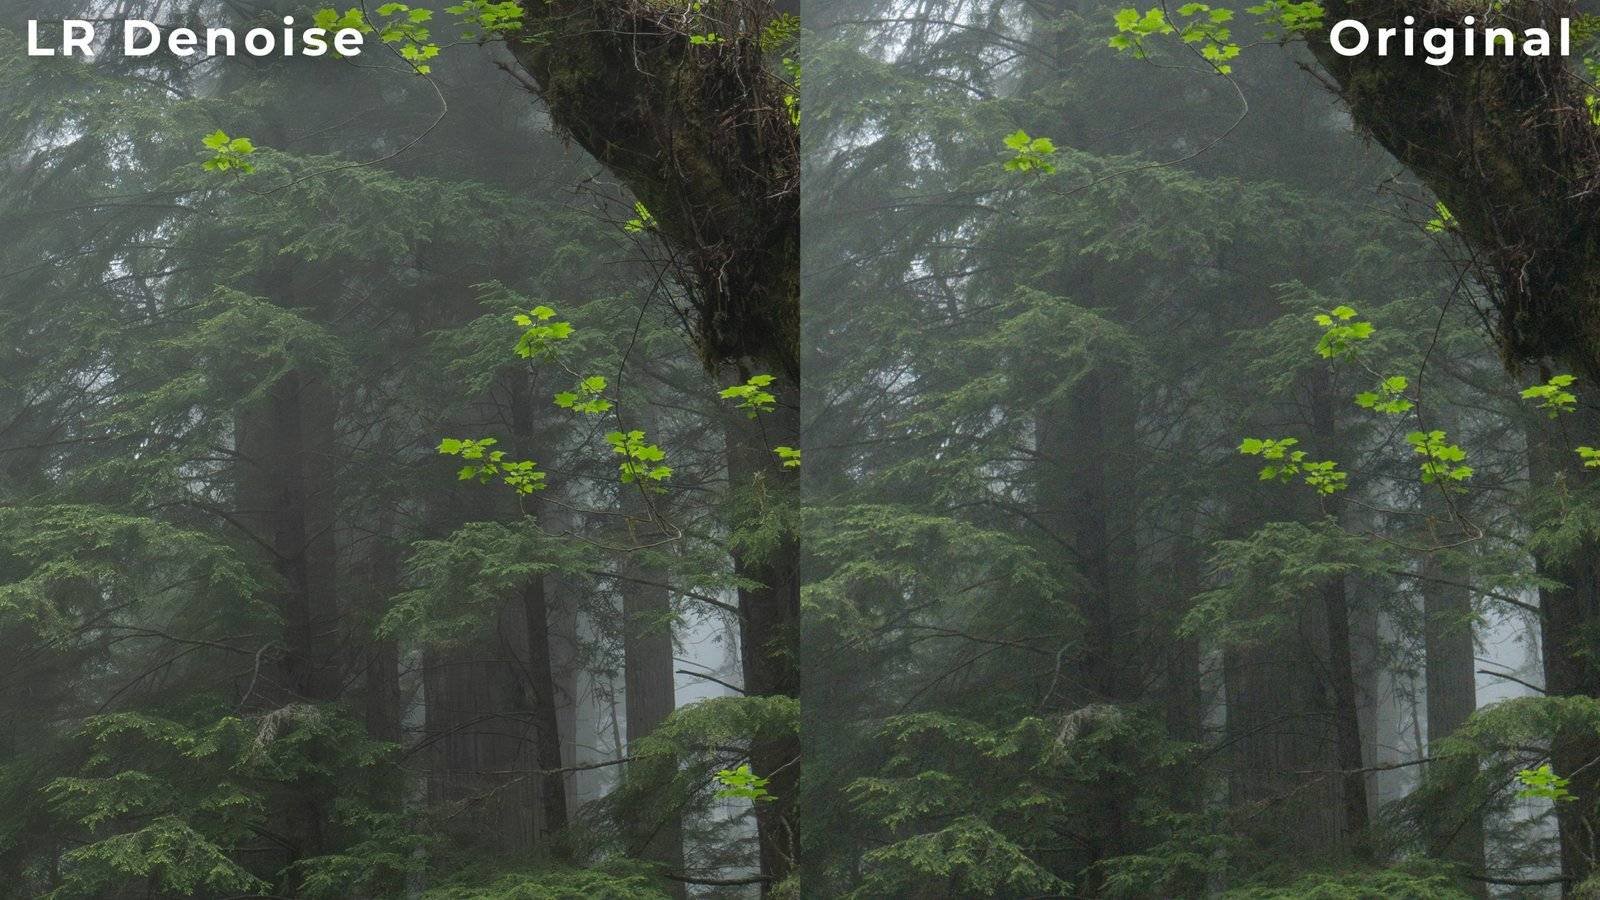
Here is our second example, a super under-exposed redwood shot at 500 ISO. You can see a bit of grain, but it’s definitely a more subtle example. Lightroom Denoise did a great job here.
Lightroom Denoise VS Topaz Labs (RAW – Raw Settings)

Here is Lightroom Denoise vs Topaz Labs RAW, and to be honest, I was both surprised and disappointed with the Topaz results here. Topaz completely destroyed some of the details, turning them into a mess of blur, and this was on a very low setting.
Lightroom Denoise VS Topaz Labs (.TIFF – Standard)

Now, here is the Topaz-edited TIFF, and it looks so much better than the RAW version. Even though Topaz encourages users to use the RAW files and apply their effects before editing, I found that the opposite worked much better in my examples. The Topaz TIFF looks comparable to the Lightroom denoise, but if you look closely, you can see a bit less detail compared to the Lightroom file.
DXO PureRAW 3 VS Topaz Labs (.TIFF – Standard)
Here is DXO vs Topaz edited TIFF, and these look quite similar in results. I think DXO did a slightly better job with the color separation and detail in this example.
DXO PureRAW 3 VS Lightroom Denoise
Here is our last example: DXO vs Lightroom Denoise. Definitely a less noticeable difference than the Milky Way high ISO shot. But here, if you look closely, Lightroom edges out the details and the color.
So which one is the best noise reduction I really have to hand it to the Lightroom team here. This tool is absolutely fantastic, and there is something to be said about the simplicity here. All I had to do was move one slider, and it came out perfect every time.
I spent hours in Topaz, creating countless versions of shots using different algorithms and sliders, even using the edited TIFFs. But out of the 20-30 different versions I made off-camera, I could never get the results to match the single Lightroom Denoise files I made. I will still continue to use the Topaz Suite for its fantastic upscale functions and sharpening, but for RAW-level noise reduction, I will stick with Lightroom.
Now I want to give some credit to Topaz here for the versatility of the tool. I think it’s great that you can apply noise reduction at any point in the process, even after fully editing an image in Photoshop. Sometimes when I edit an image, the changes made can actually introduce more noise, so for those examples, I can definitely see myself still using Topaz after the edit and then applying a lower opacity on top to finish the file off. DXO performed well for the most part, and I did enjoy the simplicity, similar to Lightroom.
All I had to do was input the RAW file, and the software did the work for me. Although because Lightroom already has Denoise and I felt the results turned out slightly better, it’s hard to justify using it.
Thank you, Michael, for the excellent work in this blog post. Methodical, conscientious and, above all, clearly written.
Thanks so much for checking it out John! 🙂
Pingback:The Best Noise Reduction Software for Landscape Photographers -
Will stick from now on for sure with my Camera Raw Denoise feature! It outperforms other specific softwares and is fully integrated into Adobe’s suite. Only cons -as for now- are the no possibility to batch-processing and the time it takes to handle each image. I suppose it has to do with “all things that deserve take their time”…
Cheers from northern Spain,
Iñaki
Pingback:lightroom denoise topaz labs review
Pingback:lightroom denoise topaz labs review - Surfing LA
I also use DXO Lab and it is really a great tool to hyave!
Great comparison! It’s interesting to see how each software handles noise reduction differently. I’ve been leaning towards Topaz Labs lately, but I might give DXO another try after reading your insights. Thanks for sharing!
Pingback:Apollo IPTV: Predictions and Tips for Getting the Most Out of Your Subscription - Kemo IPTV